Google Tag Manger (GTM) Cheatsheet
Configure gtm to track the important user events on your website.
How to create a Google Tag Manger account
To create a Google Tag Manager (GTM) account, follow these steps:
- Sign in to Google Tag Manager
- Use your Google account to sign in or create a new one if you don’t have it.
- Set Up Your GTM Account
- Click on Create Account.
- Account Name: Enter your business name or something descriptive.
- Country: Choose your country from the dropdown.
- Set Up a Container
- Container Name: Enter the name of the website or app you want to track.
- Target Platform: Select the platform (Web, iOS, Android, AMP) where you’ll use GTM.
- Click Create after filling in the container details.
- Accept GTM Terms of Service
- Review and agree to the terms to proceed.
- Install GTM on Your Website
- You’ll receive code snippets for your site after creating the container.
- Copy and paste the provided codes:
- One goes in the <head> section of your website.
- The other goes immediately after the opening <body> tag.
- Verify Installation
- Use the Preview Mode in GTM or a browser extension like Tag Assistant to confirm your tags are firing correctly.
After installation, you’re ready to start adding tags, triggers, and variables within your new GTM container. Let me know if you’d like more tips on getting started with tags and triggers!
How to Create a Google Tag
Google tag is a required tag to send events from gtm to ga4 The Google tag establishes the data flow from your website to Google Analytics and other destinations you might have set. Create one Google tag per domain and place it on every site that you want to measure.
If you don’t have this tag then events like click tel and mailto will not fire to ga4
The google tag is a connector between GTM and GA4
Create the Google Tag
In GTM,
- Go to tag add new
- Give it a name.. A nice convention for adding this tag is
Google tag configuration - example.com - Add the tag, from the “sliding draw” hit
google tag.
Adding the Measurement ID
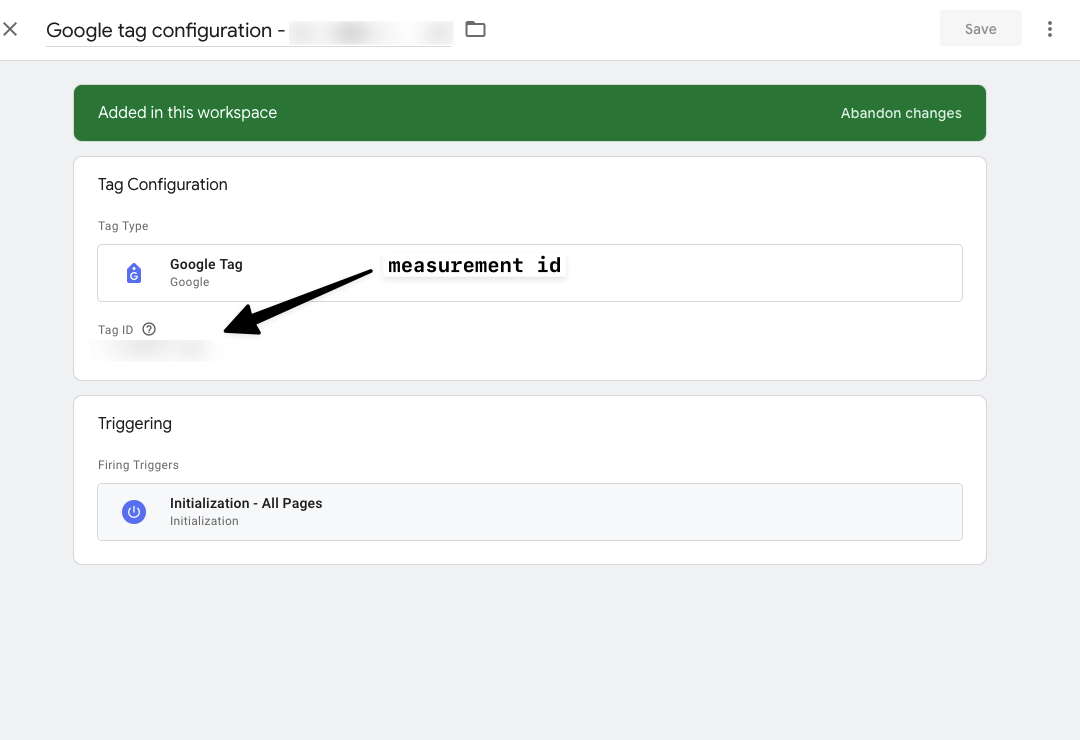
The measurement ID is required to create the Google Tag. The measurement ID can be found in your the corresponding Google Analytics account.
- In google analytics locate the GA property you wish to send data to from GTM.
- Hit the
adminbutton in the bottom left - Open
data collection and modifications - Click
data streams - Click the
webtab - Click your data stream (which probably is labeled the same as your website address)
- Find and copy
measurement id - Add event name
gtm_ga4_data, this is up to you.
Paste the Measurement ID from GA into the Tag id field in GTM.
This is what you should have.
Now the tag is created its time to add the trigger.
Add Trigger
- Add Trigger
- Choose
Initialization - All Pages - Click Save
Tracking form submissions with form id
using the existing form id. <form id = "example_001">
- copy the id.
- create a ga4 tag.
- give it an event name specific to the form submission.
- add
form_idas a parameter and add `` as the value ensure this variable is enabled. - create a custom trigger specifically for this event.
- use
form_submissionas the trigger type. - select
some formsas to target a specific form and set the requirements to beform_id= the actual form id from the form<form id = "example_001">.
Tracking form submissions with visibility element
** Prerequistes **
- Google Analytics installed on your gtm
- Google tag added to your GTM
Get your Success Message
We are going to use your form success message as the element visibility trigger. As soon as the browser renders the form success message (which is hidden by default and only visible after the form is submitted) that is when we track it as a conversion.
You can target the success message by id or css selector so you want to check the html wrapper of the success msg and copy that.
In my case my success message html is:
Its a really nice feature to have a custom id on each of your forms respectively
1
2
3
4
5
6
<div
  class="some-form-class"
  id="gform_confirmation_message_1"
>
  <p>Thanks for contacting us! We will be in touch with you shortly.</p>
</div>
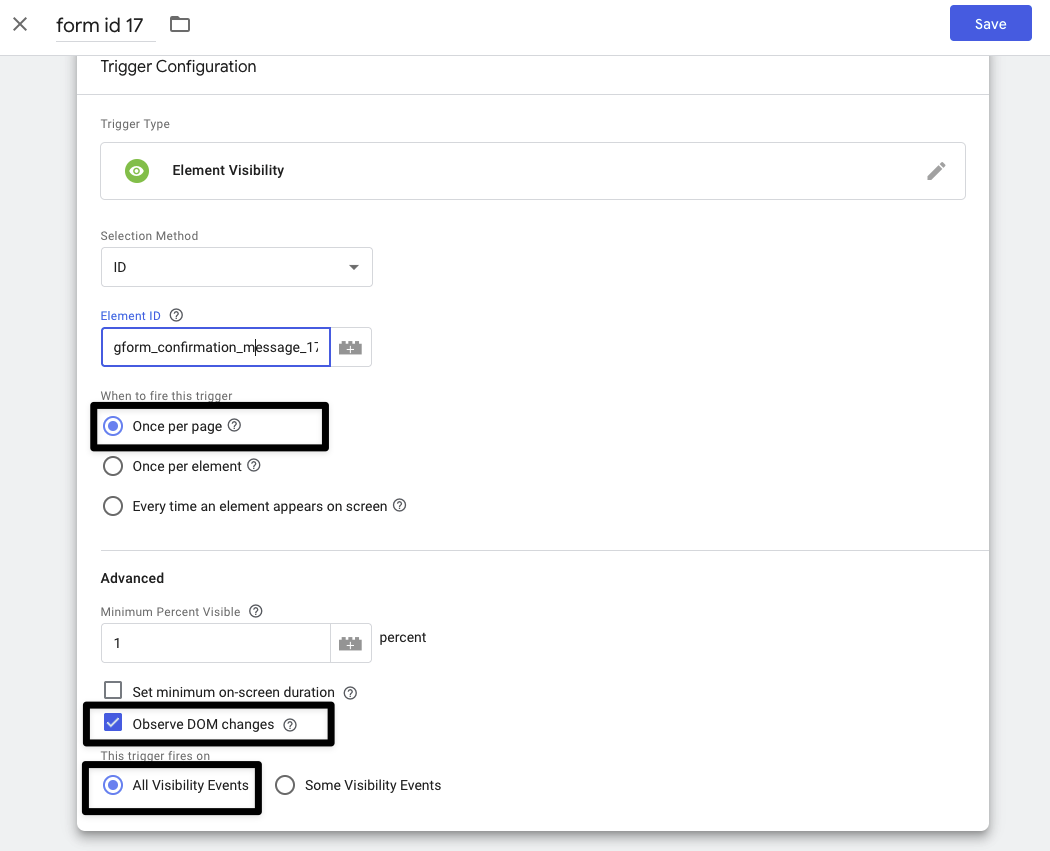
I’m going to use the id from the above wpforms-confirmation-1109. When that id is visible on the page, then the Trigger will fire.
Add Trigger
- Select the element
visibility tag Choose id or css selectorfrom drop down method selector.
Add Element ID or class
- Ensure to use the
.for the.css_selector, when targeting ids just the text is required. - Paste in the id or css class value of the success message html wrapper
- Select Once per page
- Select
minimum percent visibleto be1 - As the message will be a “new” appearance on the screen select
observe dom changes
Use the ID for best practice
Using css class can have performance hit and you will get a warning about this GTM. 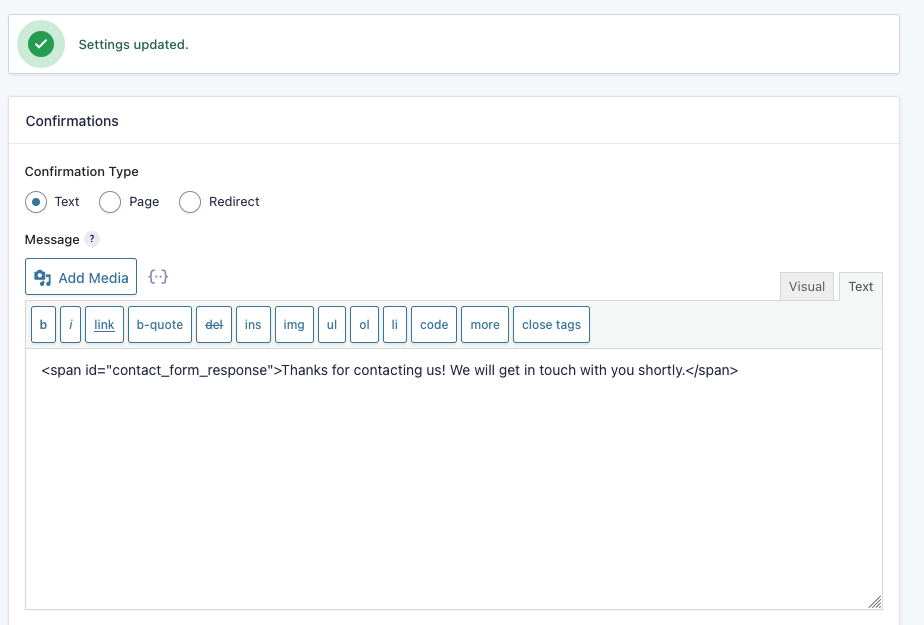
Confine trigger to Specific page
There is an option to confine your trigger to a certain page. Use this option if you are only interested in tracking form submissions from specific urls.
Set trigger to fire on some visibility events.
Page URL equals https://example.com/your-page.
Preview Changes
- Enter URL where form is, test the form submission and see if the
element visibilityevent was Triggered.
Now that the trigger is created, its time to create the tag.
Create a Tag
Add New Tag Call it same name as the trigger (this is my convention for keeping things organised) and use the following properties to finish creating your tag.
- Google analytics
- GA4
- Add
measurement id - Add event name of
generate_lead
When the event is sent, Google Tag Manager also sends the page url which is important for working out which page form was submitted on you can see these pages in pages and screens and then filter by key event Please Note: the form submission event must be marked as a key event in Google Analytics (GA).
Select Trigger
- Select your visibility Trigger you created earlier
- Save
Can I have Multiple Triggers?
If you have multiple forms you can have multiple triggers using a unique id for each form. Just keep adding more triggers. In Google analytics you can see which form was submitted.
Preview Test
- Hit Preview
- Fillout your form
- In tag manager debugger window
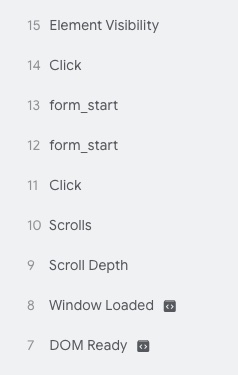
- Hit element visibility event in sidebar
- Check your form submission tag was fired.
Submit your changes.
If everything worked in the preview submit your changes.
More Info
Tracking Phone clicks
Ensure you have already created your google tag as outlined in the start of the article.
Add Click Variables
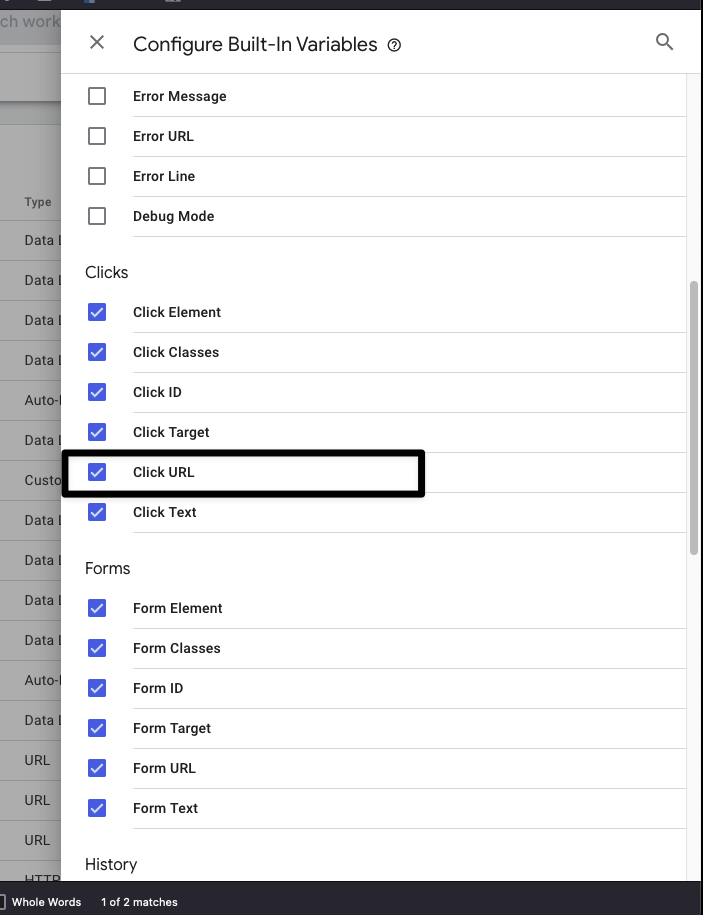
To ensure we have the required Variables enabled in GTM we need to add the ones we need for the click tel.
- Go to Variables
- Click
configurein top right - Scroll down to
clicks - For tracking phone clicks, we just need to add the
Click URLfrom the “click” section of variables. - Scroll down and enable the
Click URLby checking the check box. - Then click Add
Now that the click variables have been enabled. Its time to start making triggers and tags.
Add Triggers
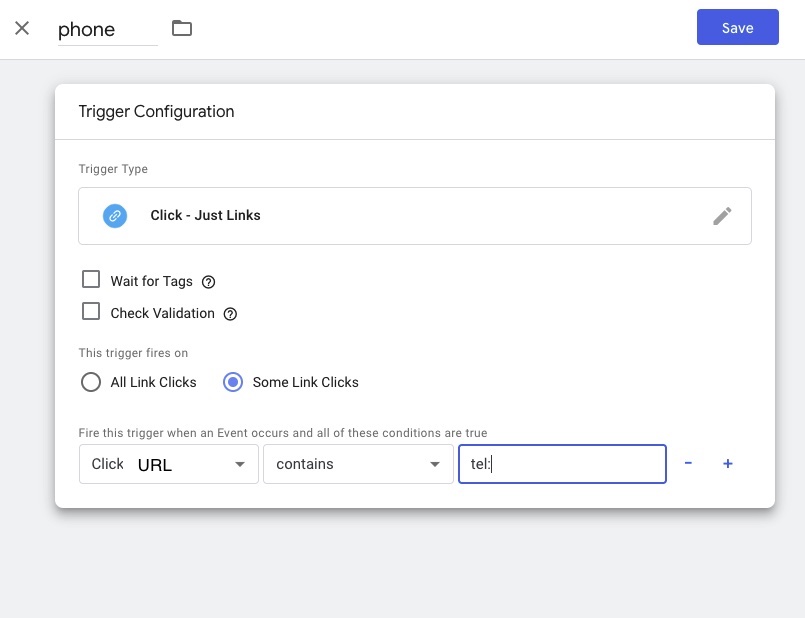
- Call it
phone_click - Click -
just links. Some link clicks.CLICK URLcontainstel:- Save
Create a Phone click Tag
- Go to
Tags - Click
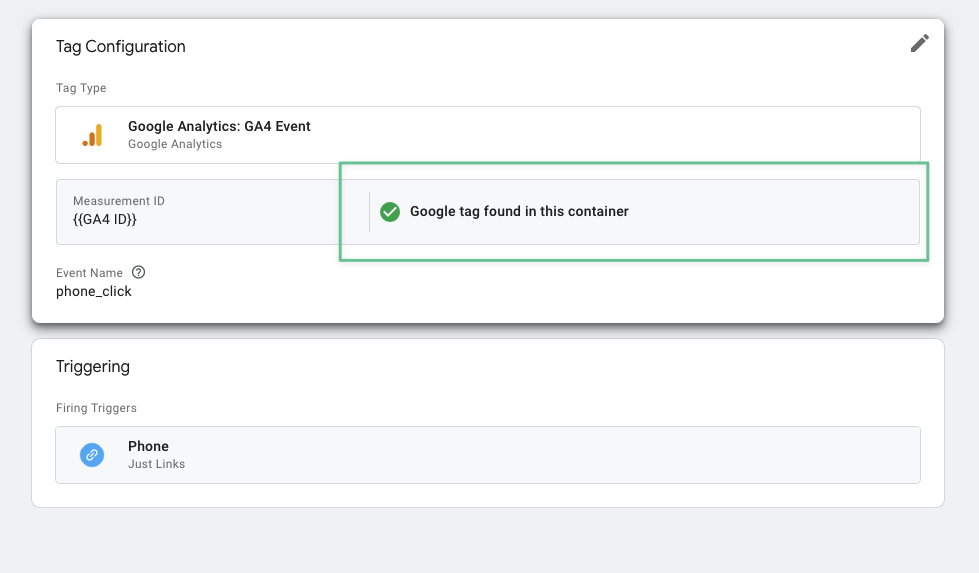
Newtag - Call it
phone_click - Tag configuration
- Choose
Google Analytics - Choose
Google Analytics: GA4 Event - Add
GA4 Measurement ID - event name
phone click
Your tag should be able to locate the google tag you created earlier. If your tag cannot find the google tag then your missing your google tag and you still need to add it.
Add Trigger To Tag
- Choose your
phonetrigger you created earlier - Hit save
Preview
- hit preview
- add url
View the data sent from GTM in GA4
- Login to Google Analytics
- Click Engagement
- Click Events
- if users have interacted with your site by clicking the click tel then you will see that event in GA4
More resources
Where to find the Google Tag Manger Integration code
Prerequisites
You have a google tag manager account
Go to tag manager
Locate your ‘container’
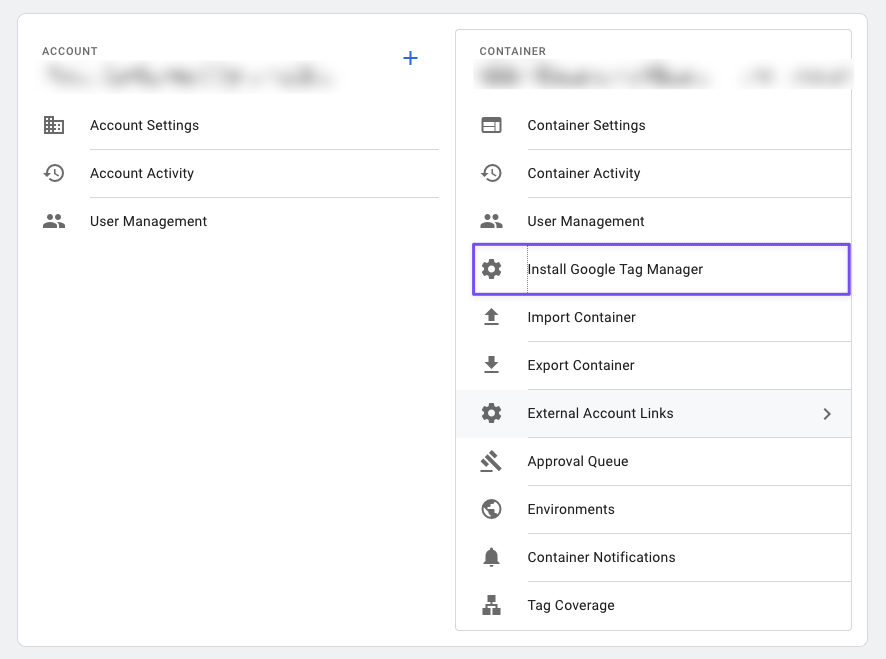
The thing you want to locate is refered to as a ‘container’ which is a bit confusing. Anyhow this is what your looking for.
tagmanager container
Get the code
- Hit the cog wheel
- Then hit the install tag manager option.
install tag manager code
Copy the code
Now you have the code appear. Ready to be copied to your website.
Cant find your container?
Ensure your logged in as the correct Google user.
Track site search 01
When your site does not use the q= query parameter.
Instead, you have something like example.com/index/search/contact then use following configuration in GTM
Go To Variables
- Create new variable called
site search term - Select
regex tableas variable type - Select
page pathas the input variable - Click
add row - For the pattern
^/index/search/(.*)for the output$1this pattern will store the value of the search in the variable$1 - Save the variable.
Create a Tag
To send search term to analytics
- Select tag configuration
GA4 event as the tag type
- Add measurement ID
- Add event name
view_search_results
Add event parameter to tag
- Add parameter named
search_term - For the value select the variable you created earlier
- Now scroll down and select triggering
Add the trigger
- add trigger called
search results - add page view which fires on some views.
- select page path
- select condition to
matches regex - add
^/index/search/(.*)as the value (or whatever values your search result page uses)
The trigger ensures the event only fires on the search results page
Track site search 02
When your site uses a query string. Here’s how you can set up site search tracking using GTM and Google Analytics:
- Create a URL Variable in GTM
- Navigate to Variables: In GTM, go to the “Variables” section.
- New URL Variable: Click “New” and select the “URL” variable type.
- Configure the Variable:
- Set the Component Type to “Query.”
- In the Query Key field, enter keys (since your search URL is structured like /search?keys=baker).
- Save: Name the variable (e.g., “Search Query”) and save it.
Setting the Query Key
When setting up your URL variable in GTM, “keys” refers to the name of the query parameter in your site’s search URL. In your URL structure, for example, /search?keys=baker, the part before the equals sign (keys) is the query parameter name. GTM will use this name to look for and extract the value (in this case, “baker”) from the URL. So when configuring your variable, you enter keys in the “Query Key” field to tell GTM to capture whatever comes after keys= in your search URLs.
- Update Your Google Analytics Tag in GTM
- Modify Your Tag: Open your existing Google Analytics pageview tag (or create a new one if needed).
- Attach the Variable:
- You can pass the search term as a custom dimension or simply rely on the URL if you prefer.
- If you’re using a custom dimension, add the variable “Search Query” to the tag’s settings.
- Restrict Firing (Optional):
- Consider creating a trigger that only fires on pages matching /search so that the search query is only sent when applicable.
- Enable Site Search Tracking in Google Analytics
- Access GA Settings:
- In Google Analytics, navigate to Admin > View Settings.
- Turn On Site Search Tracking:
- Scroll down to Site Search Settings.
- Set Site search Tracking to ON.
- In the Query Parameter field, enter keys.
- Save Your Settings: This tells GA to look for the “keys” parameter when processing pageviews.
- Test and Publish
- Preview Mode: - Use GTM’s Preview mode to simulate a search URL (e.g., /search?keys=baker). - Verify that your GA tag fires correctly and that the variable captures the search term.
- Check in GA: - In GA, check Real-Time or later reports to see if search queries are being recorded.
- Publish:
- Once confirmed, publish your GTM container.
Additional Tips
- For GA4 Users:
- If you’re using Google Analytics 4, you might want to set up a custom event in GTM that sends the search term as a parameter. Then, register this parameter in your GA4 property.
- Consistency:
- Make sure your search parameter is always “keys” across all search URLs.
- Debugging: - Use browser developer tools and GTM’s debug console to inspect the data being sent.
This setup will allow you to capture and analyze the search terms users enter on your site using the power of GTM and Google Analytics.
GTM Access
Dont know who the owner of a Google Tag Manger (GTM) account is?
** Audit User Permissions: ** Check the users listed on the Google Analytics (GA) account. The creator of the Google Tag Manger (GTM) is probably also listed as an admin on the Google Analytics (GA) account.
How to share access to Google Tag Manger (GTM)
Login at https://tagmanager.google.com
Go to Admin
See screenshot https://share.cleanshot.com/vt8W9sDv
Go to User Management
See screenshot https://share.cleanshot.com/m6zyCXT5
Add user from the forthcoming slideout screen
Set Permissions
- Check the Admin box under both Account Permissions and Container Permissions.
- For Container Permissions, select Publish along with Read, Edit, and Approve to provide full access at the container level.
Add custom html script
Add a javascript snippet to your website to integrate a third party functionality.
Tags
- Hit new
- Configure tag
- Create
custom htmltag calledhotjar, wildjar, linkedin or facebookcode - Paste script including script tags
Triggers
- Create trigger to fire on
all pages - Preview to check the tag is firing
test
- In preview you should see tag firing
Why store scripts in Google Tag Manger?
- No developer required
- If you rebuild your site, Just add the 1 Google Tag Manger Script back into your site and thats it. ALl your 3rd party integrations have been carried across to your new site.
- no login to website required
GTM trigger types
Page URL
In Google Tag Manager (GTM), the “Page URL” trigger is used to fire tags based on the URL of the page being viewed.
Click URL
In Google Tag Manager (GTM), the “Click URL” trigger is used to fire tags based on the URL of a clicked link or element.
you can combine
page urlandclick urltrigger to only track link clicks on specific page
Click Classes
In Google Tag Manager (GTM), the “Click Classes” trigger is used to fire tags based on the CSS classes of the clicked element.
Click Element
In Google Tag Manager (GTM), the “Click Element” trigger is used to fire tags based on interactions with specific elements on your webpage. This trigger allows for a high level of specificity, enabling you to track clicks on virtually any HTML element. Here’s how to use and set up a Click Element trigger:
Click Text
In Google Tag Manager (GTM), the “Click Text” trigger is used to fire tags based on the text content of the clicked element. This is useful for tracking interactions with elements that have specific text, such as buttons, links, or other clickable elements with identifiable text.
GTM Containers
What are containers?
Google Tag Manager (GTM) containers are essentially the workspaces that hold all the tracking codes (tags), triggers, variables, and other configurations for a specific website or app. When you create a container, you’re setting up a place to manage all the tags for that particular site or app in one central location. Here’s a more detailed breakdown of what GTM containers are and what they do: Key Components of a GTM Container:
Tags: Tags are snippets of code (usually JavaScript) that send information to third-party services like Google Analytics, Google Ads, Facebook Pixel, and other marketing/analytics platforms. A container can hold multiple tags for various services. Triggers: Triggers define when and where the tags are fired. For example, a trigger might be set to fire a tag on all page views, on specific button clicks, or after a form submission. Variables: Variables are dynamic values that GTM uses to pass information between tags and triggers. For example, a variable could be the value of a page URL, a click text, or a custom data layer value. Folders: GTM also allows you to organize tags, triggers, and variables into folders to keep things structured, especially when managing a lot of elements.
How Containers Work:
One Container per Website/App: Each website or app typically has its own container. Once you create a container, you install it on your website or app by adding the GTM container code snippet to your site’s HTML or through a platform-specific integration. Centralized Management: The benefit of a container is that it centralizes the management of all your tracking codes. Instead of editing a website’s code every time you want to add or change a tag, you can simply update the tags within GTM, making the process much faster and less error-prone.
Benefits of Using GTM Containers:
Faster Deployment: You can add, edit, or remove tracking tags without needing to modify the website’s source code. Flexibility: Containers support tags from many third-party vendors, not just Google services, making it easier to manage multiple marketing and analytics tools. Version Control: Each time you make changes to a container and publish them, GTM creates a version history, allowing you to revert to an earlier version if needed.
In summary, a GTM container acts as a container for all the tracking and analytics scripts on your website or app, offering centralized control and flexibility.
What permissions are needed to create containers in GTM?
To create containers in Google Tag Manager (GTM), you need specific permissions at the account or container level. GTM has different roles, and the permissions granted depend on the role you are assigned.
Here’s a breakdown:
Account Permissions:
Admin: Full control, including creating containers, managing permissions, and all account-level actions. User: Limited to container-level actions unless additional container permissions are granted.
Container Permissions:
Read: View container configuration but cannot edit or create anything. Edit: Modify tags, triggers, and variables but cannot publish changes. Approve: Approve changes made by others but cannot publish. Publish: Make changes live by publishing them.
To create a new container:
You need to have Admin access at the account level, as container creation is an account-level action. If you’re unsure of your permissions, you can check by going to Admin > User Management in GTM. There, you’ll see your role and what actions you’re allowed to perform.
How to update user permissions in GTM
To change a user’s permission in Google Tag Manager (GTM), you’ll need to have Admin access to the GTM account. Here’s how you can do it: Steps to Change User Permissions in GTM:
Log in to Google Tag Manager: Go to Google Tag Manager and log in with your Google account.
Select the GTM Account: If you have access to multiple GTM accounts, select the one where you want to change the user’s permissions.
Go to the Admin Panel:
In the top navigation bar, click on the Admin button. This will bring you to the Account and Container settings.
Manage User Permissions:
Under the Account section, click on User Management. This will show you a list of users who have access to the account and/or containers.
Select the User:
In the user list, find the user whose permissions you want to change. Click on their name to open their permission settings.
Change Account Permissions (Optional):
If you want to change their Account-level permissions, you can select: Admin: Full control, including the ability to add/remove users and create/delete containers. User: Limited access, restricted to container-specific permissions.
Change Container Permissions:
You can also modify their permissions for specific containers within the account. Under Container Permissions, you will see a dropdown next to each container. You can set it to:
No Access: The user has no access to this container. Read: View-only access to the container. Edit: Ability to modify tags, triggers, and variables, but not publish changes. Approve: Ability to approve changes made by others but not publish them. Publish: Full control to edit, approve, and publish changes.
Save Changes: After adjusting the permissions, click the Save button to apply the changes.
Notes:
You can assign different permissions for different containers. For example, a user can have Publish rights on one container and only Read access on another. You can also add new users and set their permissions in the User Management section.
By following these steps, you’ll be able to manage and adjust user permissions within your GTM account.
Woocommerce Tracking
- Install free woocommerce plugin (https://gtm4wp.com/)[Woocommerce plugin for google tag mananger integration]
- Activate the woocommerce tracking in the plugin settings
- Download predefined container (it already has all the ecommerce tracking events already created.) (https://gtm4wp.com/google-tag-manager-for-woocommerce/how-to-setup-enhanced-ecommerce-tracking-google-analytics-4-ga4-version)[https://gtm4wp.com/google-tag-manager-for-woocommerce/how-to-setup-enhanced-ecommerce-tracking-google-analytics-4-ga4-version]
- Import predefined container into new gtm workspace (same account, just a new workspace for easier integration, so create a new workspace to import the container data into)
- go to tags
- update the measurement id in the new ecommerce event
- submit the updates and do some testing, you should see the following events start to appear in Google Analytics.
1
view_item|view_item_list|select_item|add_to_cart|remove_from_cart|view_cart|begin_checkout|add_payment_info|add_shipping_info|purchase

